Mein erstes Auto habe ich ja geschenkt bekommen, eine furchtbare Klapperkiste, aber sie fuhr. Wenig später hat mein Freund den roten VW Golf von seiner Oma übernommen und wir hatten endlich ein „anständiges Auto“.
My first car actually was a gift: an awful boneshaker, but it was still driving. Just a little later, my boyfriend got the red VW Golf that his granny used to drive and finally, we had a “decent car”.
Seitdem regiert bei uns (ja, ich bin mit eben diesem Freund immer noch zusammen und mittlerweile sogar verheiratet) der Pragmatismus: Autos müssen funktionieren, praktisch sein und ein Mindestmaß an Komfort mitbringen.
Daher wird die nächste Familienkutsche ein Siebensitzer, Van oder VW-Bus – wenn der Kopf bestimmen darf. Wenn aber das Herz regiert, dann sollte es ein Käfer sein, am liebsten alt und charmant mit dem man auch „oben ohne“ fahren kann.
Und weil doch immer der Kopf das letzte Wort hat, man seine Träume aber nicht aufgeben soll, habe ich eine extra Spardose gebastelt – fürs Traumauto.
Hast du auch ein Traumauto? Auch so was „unvernünftiges“? Dann fang doch an darauf zu sparen (wenn es ein seeeeehr unvernünftiger Wunsch ist, kannst du dir von dem Ersparten ja vielleicht zumindest mal für ein Wochenende ein solches Auto leihen 😉 ) und bastle dir deine persönliche Autospardose!
Since then, we (yes, I’m still with my boyfriend from back then and in the meantime we even got married) have been very pragmatic: cars need to function, have to be useful and offer a minimum level of comfort.
That’s why our next family car will either be a van, a seven-seater, or a VW bus – if our heads decide. But if our hearts decide, it should be a Beetle. Preferably an old and charming one, one in which you can drive around “topless”.
But since the head always has the final say, but you don’t want to give up on your dreams either, I made an extra coin bank – for our dream car.
Do you have a dream car? Something just as unreasonable“? Well, then why don’t you start saving (if it’s a reeeaally unreasonable wish, you might at least get to rent such a car for a weekend from the money that you’ve managed to save ;-)) and craft your personal car coin bank!
Das brauchst du:
- leeres, sauberes Gurkenglas mit Schraubdeckel aus Metall
- kleines Modellauto (z. B. dieses hier)
- Sprühfarbe
- eine kurze, dünne Schraube mit Senkkopf
- dünner Bohrer (passend zur Schraube)
- Akkuschrauber
- Schleifpapier, Körnung 120
- Hammer
- 2-Euro-Münze
- Schraubendreher
- Einmalhandschuhe
- Bleistift
- Lineal
- Cutter
This is what you need:
- Clean, empty pickle jar with metallic screw cap
- Small model car (e. g. this one right here)
- Spray paint
- A short, thin screw with a countersunk head
- Slim driller (suitable for the screw)
- Electric drill
- Sandpaper, 120-grit
- Hammer
- 2-euro-coin (or the biggest coin in your local currency)
- Screwdriver
- Disposable gloves
- Pencil
- Ruler
- Box cutter

Und so wird es gemacht:
- Bohre mit dem Akkuschrauber mittig ein Loch in den Boden des Modellautos
- Setze das Modellauto auf den abgeschraubten Deckel des Gurkenglases. Platziere es so, dass seitlich noch ausreichend Platz für den Geldschlitz ist. Markiere die Stelle für den Geldschlitz mit einem Bleistift.
- Jetzt nimmst du das Lineal und zeichnest einen geraden Strich über die Markierung. Lege die 2-Euro-Münze mittig auf den Strich und markiere die Stellen, an denen das Geldstück links und rechts den Strich trifft.
- Nun hast du die Position deines Schlitzes festgelegt. Lege das Lineal wieder auf den Strich und schneide die Schlitzlinie sehr vorsichtig mit dem Cutter nach, bis du durch den Deckel durchgeschnitten hast.
- Nun nimmst du die 2-Euro-Münze, legst den Deckel auf eine Unterlage (z. B. ein Frühstücksbrettchen) und schlägst das Geldstück mit dem Hammer vorsichtig durch den Schlitz. Wiederhole diesen Vorgang so oft, bis das Geldstück mühelos durch den Schlitz gleitet.
- Mit dem Schleifpapier glättest du nun die scharfkantigen Schlitzränder im inneren des Deckels.
- Bohre mit dem gleichen Bohrdurchmesser wie eben ein Loch in den Deckel, dort wo das Auto sitzen soll.
- Jetzt kannst du die Schraube von innen durch den Deckel in das Loch im Auto schrauben. Gut festziehen.
- Den Deckel musst du nun, mitsamt des Modellautos, farbig ansprühen. Bitte mach das an der frischen Luft und lege dir ordentlich Zeitung o. Ä. unter. Ziehe dir die Einmalhandschuhe an, schüttle die Dose kräftig, bis sich die Kugel im Innern frei bewegt und sprühe dann mit ca. 20 cm Abstand zum Deckel alles ordentlich mit Farbe ein.
- Lass den Deckel trocknen und wiederhole den Vorgang nach Bedarf. Am Ende solltest du einen gleichmäßigen Farbauftrag haben und alle Stellen sollten lackiert sein – auch der Rand und die „Ritzen“.
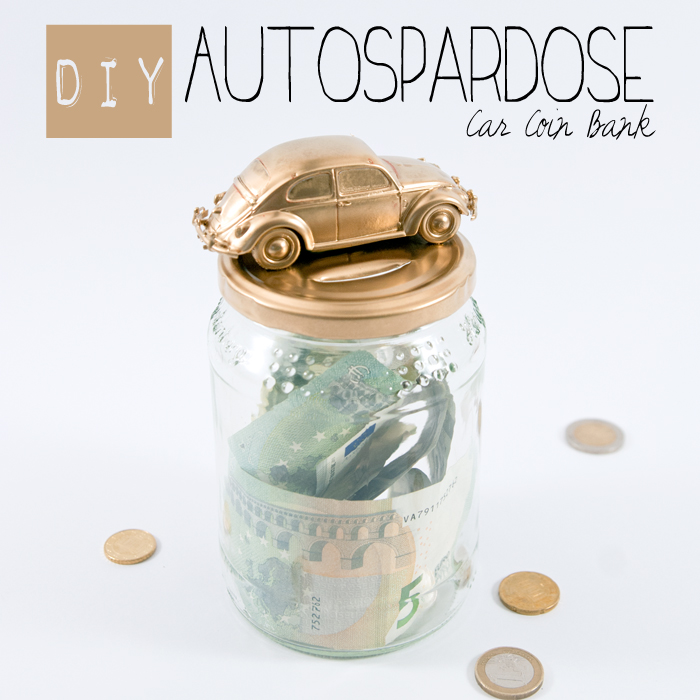
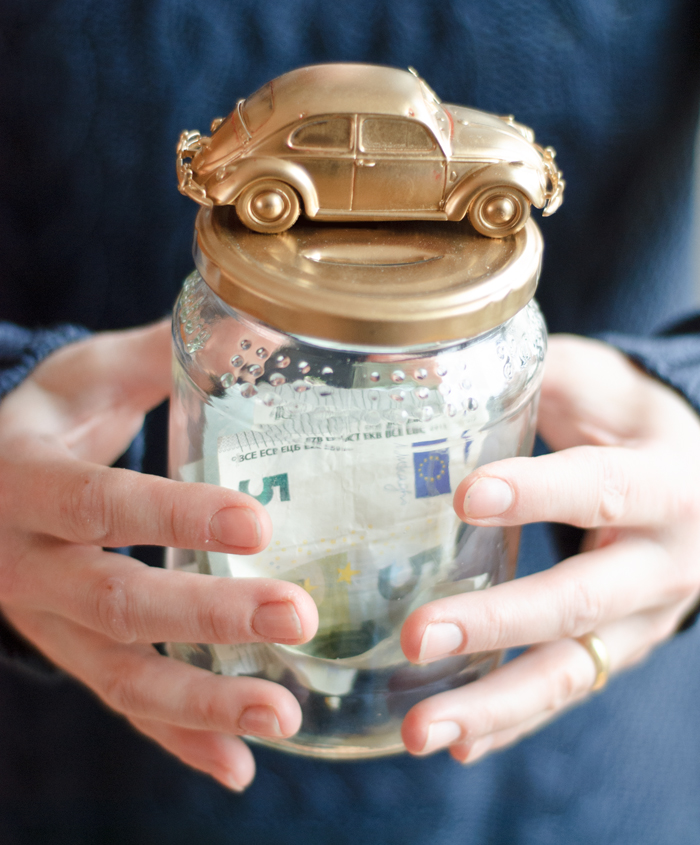
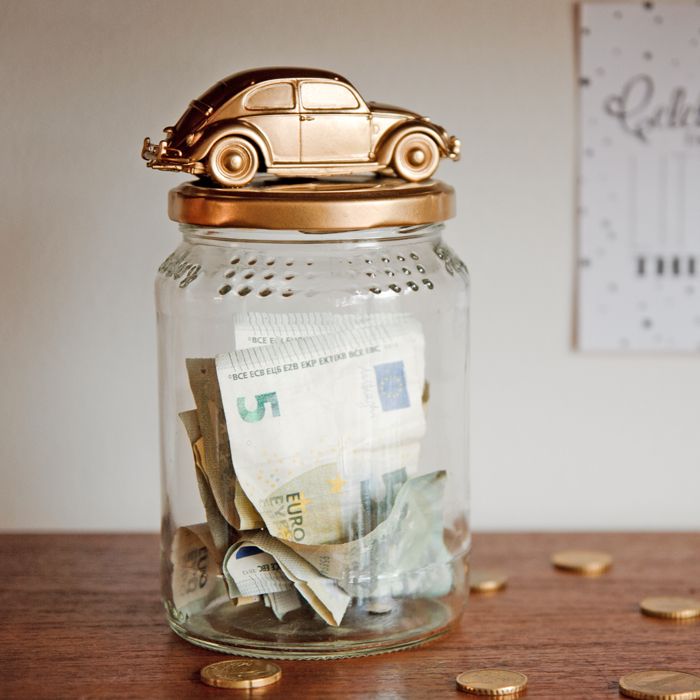
- Nachdem alles getrocknet ist, kannst du den Deckel wieder auf das Glas schrauben. Fertig ist deine Autospardose!
Tipp: Wenn du magst, kannst du auf das Glas mit Glasmalstift noch einen netten Spruch schreiben.
And this is how it’s done:
- Use the electric drill to bore a hole in the middle of the bottom of the model car.
- Put the model car on the cap that you’ve taken off the pickle jar. Place it in a way that there’s enough space on the side for the slot. Mark the position of the slot with a pencil.
- Take the ruler and draw a straight line across the mark. Place the 2-euro-coin on the centre of the mark and make a mark where the coin meets the line on the left and the right.
- Now, you’ve defined the position of the slot. Put the ruler on the line and carefully cut along the line for the slot until you’ve cut through the cap
- Take the €2-coin, put the cap on a supporting pad (e. g. a cutting board) and carefully hammer the coin through the slot. Repeat this step until the coin easily glides through the slot.
- Use the sandpaper to smoothen the sharp edges of the slot on the inside of the cap.
- Use the same drilling diameter to bore a hole into the cap where the car is supposed to sit.
- Now, you can drive the screw from the inside through the cap into the hole in the car. Make sure to tighten the screw firmly.
- Spray paint the cap and the model car in the colour of your choice. It’s advisable to do this outdoors and put enough newspaper underneath it. Wear the disposable gloves, shake the can well and then spray paint everything while keeping a distance of about 20 cm.
- Let the cap dry and repeat the last step if necessary. In the end, the cap and the model car should be coloured evenly, all of it – including the “cracks”.
- After the car has dried, you can put the cap back on the jar. Now you’ve got your very own car coin bank!
Tip: If you like, use a marker to write a nice quote on the jar.
So eine Spardose ist auch ein klasse Geschenk für Teenager, die sich mit dem Thema Führerschein auseinander setzen. Man kann damit z. B. in der Verwandtschaft sammeln gehen 😉 Und in so einer hübschen Verpackung sind die Scheinchen (oder auch Münzen) doch viel stilvoller aufgehoben als in einem Umschlag, oder?
Such a car coin bank is also a nice gift for teenagers, who are thinking about getting their driver’s license or are already working on it. You could, for example, use it to collect money from relatives 😉 And don’t you think that such a beautifully decorated coin bank is a much more beautiful place to keep the coins and bills than a boring envelope?
For more ideas about Cars/DIY/Upcycling, you should check out the collaborative Pinterest board “DIY bloggers for Volkswagen” – it’s worth it!
Have fun crafting and saving!
Für mehr Ideen rund um das Thema Auto/DIY/Upcycling schaust du am besten mal auf dem Volkswagen Pinterestboard „DIY Bloggers for Volkswagen“ vorbei – es lohnt sich!
Viel Spaß beim Nachbasteln und Sparen wünsche ich dir!

Dieser Post ist in Zusammenarbeit mit Volkswagen entstanden und muss deshalb als ANZEIGE gekennzeichnet werden. Alle Ideen, Tutorials und Texte wurden von mir verfasst und spiegeln meine eigene, ehrliche Meinung wider. Was das angeht, bin ich nicht käuflich 😉
This post was created in cooperation with Volkswagen and is therefore labelled as an advert. I have created all ideas, tutorials and descriptions and they reflect my personal, honest opinion. For that matter, I am not for sale. 😉
Ich würde für einen alten Camper-Bulli sparen. 🙂 Die Spardose sieht super aus, gerade als Geschenk zum 18.
Liebste Grüße zu dir
Eva